Mar . 18, 2024 17:16 Back to list
Meat Processing Machinery-How To Grind Your Own Meat in the Food Processor
How To Grind Your Own Meat in the Food Processor
Grinding your own meat might seem like something best left to the trained professionals or the eager DIY crowd, but I truly feel that grinding your own meat should be an every day, every kitchen, affair. Small batches are easy to do with just a food processor, and then you get total control over the freshness, quality, and kinds of cuts going into the mix. Doesn’t that sound like a win-win situation?
Why You Should Grind Your Own Meat
I first learned this technique of grinding meat in the food processor years ago from a Cook’s Illustrated recipe, and I have since seen it endorsed by the likes of Mark Bittman in the New York Times and Alton Brown for his show Good Eats.
Years later, it’s still the method I turn to when I want a truly outstanding burger for a summer barbecue or if I want to experiment with blends of meat I can’t find at the store. This is one of those techniques that transcends recipes and makes us feel like chefs in our own kitchens.
But even beyond that, I like having the control over the freshness and quality of my ground meat. If you enjoy a medium-rare burger, as I do, but get the heebie-jeebies from all the food safety warnings associated with ground beef (as I also do), this is the way to go.
There’s less risk of cross-contamination when you are grinding a single, large cut of meat on your own equipment, plus you get to choose the cut of meat being used — no mix of leftover trimmings here.
The meat you grind yourself is also considerably fresher than ground meat at the store, which (at best) has been sitting in the case for a few hours. This isn’t usually a food safety concern, but ground meat compacts the longer it sits and can give your meatloaf and meatballs a denser texture.
The Meat-to-Fat Ratio is Important
Use this method with any type of meat — beef, pork, lamb, chicken, or even fish. One of the perks of grinding your own meat is getting to use cuts or blends of meat that you don’t normally see in the butcher case.
Want to make a 100% ribeye burger? Or a special shrimp and pork filling for your homemade Asian dumplings? Or ground chicken with your favorite organic brand? This is your opportunity.
I do have on one big caveat, however: you need some fat. Or rather, I should say that I highly recommend some fat for most recipes. You can still grind lean meat, but it’s a challenge to cook well. Without some fat, lean ground meat is often tough and tasteless once cooked. Having at least 20% fat in your mix will do the job quite nicely, which is about the equivalent of a well-marbled cut of meat.
Which Cuts of Meats to Grind
For beef, pork, and lamb, I recommend using shoulder cuts. There’s a reason why these are most butchers’ top choice for the 80/20 blend in their cases — shoulder cuts generally contain the perfect amount of fat in and around the muscle.
For a richer mix, closer to a 75/25 blend, use a mix of fattier cuts like brisket, shank, short ribs, or well-marbled steak cuts. And if you want to stick with a lean mix of 90/10, either use a bottom round or leg cut from the rear of the animal, or trim the exterior fat from any other cut.
Read More: Everything You Need to Know About Ground Beef
For chicken and turkey, stick with dark meat or a blend with mostly dark meat cuts so that you’re getting as much fat as you can from these otherwise lean animals. If you use white meat, just be aware that the cooked meat might be a bit dry and chewy. Ground chicken and turkey also does well in things like pasta sauce or lettuce wraps where other ingredients in the recipe help boost the flavor and texture of the lean meat.
The same is true for making ground fish or other seafood. I find that fattier fish like salmon and tuna tend to do the best when making things like fish burgers, which need to hold together and have some juiciness, but leaner mixes from shrimp, scallops, or other seafood are fantastic for making dumplings and small fish balls for soups.
If you want to add a little fat to any ground meat mix, you can ask your butcher for some pork fatback or any of the fat they’ve trimmed from other cuts — or save and freeze the fat you trim away when making other dishes. Process this fat into your mix along with the meat itself.
Keep It Chill
The key to grinding meat at home in a food process is keeping everything very cool. Not only does this help chop the meat more cleanly, but it also helps prevent the fat from melting.
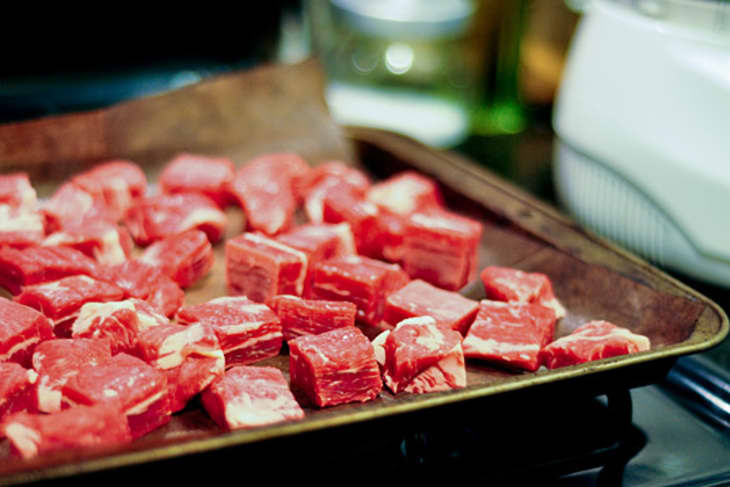
Cut all the meat into cubes roughly 1-inch in size, arrange them in a single layer on a baking sheet, and set this in the freezer. You want to freeze just long enough so that the edges and corners of the cubes feel stiff, but the middles are still pliable. Freezing for 20 to 30 minutes should do it; be careful not to freeze the meat completely, or it will be too frozen for the blades to cut.
Speaking of the blade, go ahead and throw that in the freezer, too. If you have space, you can put the whole bowl in the freezer, but I’ve found that it makes the most difference to have the blade be chilled.
Handle the meat as little as possible both as you transfer it into the food processor and as you’re scooping it out. Use a spatula or other utensil if possible, and avoid using your hands, which will quickly warm the meat.
Don’t Over-Process the Meat
Ground meat made in the food processor won’t look quite the same as the meat you buy at the store. It will look more like coarsely-chopped meat or meat crumbles instead of the extruded strands we’re used to. Resist the temptation to process the meat until it looks like paste; in a food processor, grinding to this extent will overwork the meat, making it tough once cooked.
Cleaning the Food Processor
When you’re done using your food processor for grinding meat, clean it as you would any other kitchen tool or surface that came into contact with raw meat. Clean the food processor right away so that the leftover bits of meat don’t have time to try and stick in the nooks and crannies; if you can’t get to it right away, rinse the bowl and the blade under running water to dislodge the remaining meat.
I usually put the bowl and lid in the dishwasher, then wash the blade by hand to prevent it from dulling too rapidly. If you don’t have a dishwasher or want to be extra careful about cross-contamination, you can also wipe your food processor with an all-natural disinfecting cleaner in a spray bottle.
Tips for Grinding Meat in the Food Processor
- Cut all the meat into 1-inch cubes to make it easier to grind.
- Freeze the meat in a single layer until stiff on the edges and corners, but still pliable in the middle.
- Freeze the food processor blade.
- Only fill your food processor half-full when grinding — work in batches if needed.
- Do not over-process the meat — aim for finely chopped meat, not paste.
- Clean (or at least rinse) your food processor right after using it before any leftover meat has time to dry.

